
How To Install Landscape Edging for Functionality and Style
Edging is a vital functional and aesthetic purpose in landscape gardening.
It creates clear boundaries between lawns, paths, flower beds and other garden sections, enhancing visual appeal while preventing grass and weeds from spreading. It also significantly reduces the difficulty of maintaining an attractive outdoor space for many years after completing a landscaping project.
Most professionals recommend metal edging due to its longevity, ease of use and environmental benefits — which is why Permaloc carries over 600 variations of the product.
Before purchasing your metal edging for a project, it’s important to understand how to install landscape edging correctly for the best possible results.
What To Consider When Planning the Project
Consider the following factors when choosing the right edging and installation technique for your project.
The Purpose of the Edging
Although all edging exists primarily to create a division between areas of the ground, there are more specific purposes that edging may have.
Common applications for landscape edging and restraint projects include landscape beds, walkways, maintenance strips and sports surfaces such as running tracks. Different requirements may require different varieties of edging products.
Which Material To Use
There are different materials commonly used for landscape edging: plastic, wood, stone and metal.
Plastics such as polyurethane and PVC are popular for their low prices and safety of installation (due to the lack of sharp edges). Other landscape gardeners opt for the thickness of wood or stone if they want the edging to be a noticeable garden feature.
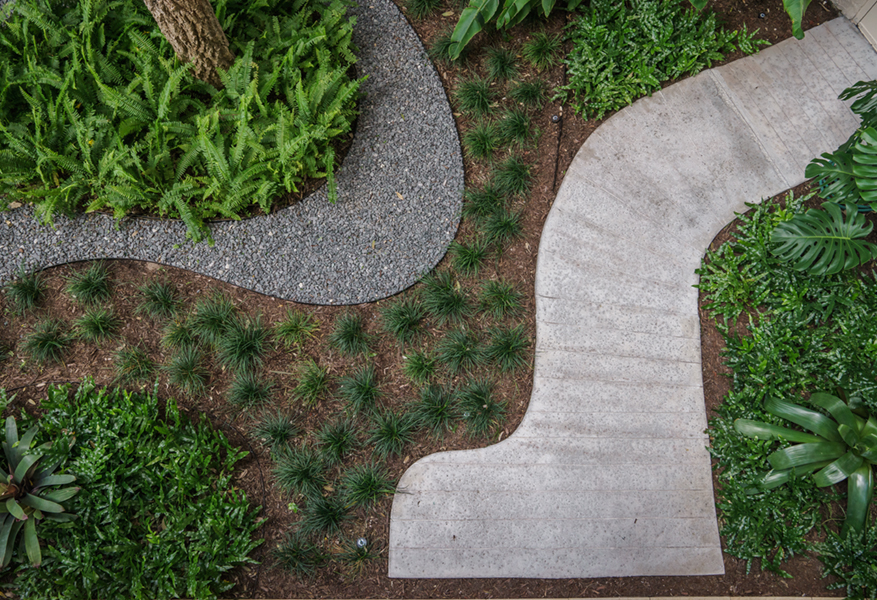
Metal provides the most benefits for most projects. Metal is stronger, longer-lasting and more visually discreet than other edging materials. Metal excels in creating a neat, subtle line between different landscape sections.
Most metal landscape edging products are made from either steel or aluminum. While steel is prized for its durability, most types are prone to corrosion long-term. Aluminum, while more malleable and ideal for curved boundaries, is also highly durable and resistant to rust.
Which Style To Choose
There are many different styles of landscape edging to choose from. Some edging is designed to protrude above the ground, such as for raised flower beds, while other products are designed to remain just at the surface.
You can also buy edging in different shapes, from flat strips to curved edging. The texture also varies — many edging strips are corrugated to enhance stability, resist wear and tear and reduce the chance of moving over time.
The optimum thickness of edging depends on its desired purpose. Some prefer thinner edging that forms a barely visible barrier while others choose thicker edging that contributes to the project’s aesthetic. Thicker edging can also be useful for raised beds where soil needs to be kept in place.
Many edging products are also available in different colors and textures for aesthetic purposes. You may even be able to apply paints or coatings to edging products to suit your project.
A Step-By-Step Process for Success
It is important to take the installation step-by-step to ensure the best results when installing landscape edging.
Step 1: Mark the Edge Line and Prepare the Landscape
The first thing you will need to do is mark your edge line with a rope or hose, then dig your trench along the marked line.
You can use a straight-edged shovel or a trenching machine for this. Most professionals suggest digging the trench 1-inch deeper than the edging being installed.
Remove any roots, stones or other obstacles from the trench before installing the edging.
Step 2: Cutting and Preparing Edging Material
To cut your edging strips to the right length, you’ll need a measuring tape, a marker and metal-cutting tools such as a hacksaw (provided that it is suitable for metal) or sawzall with an appropriate metal blade.
Measure the desired length and mark it clearly on the strip, then carefully cut along the marked line. You can then file any sharp edges down for safety if needed. You can connect separate edging strips using additional connectors that are available with most edging products.
Step 3: Installing Landscape Edging
For most purposes, the edging should be placed into the trench with the top approximately half an inch above grade. To achieve this, drive the stakes through their holes (you may need a tool such as a hammer), leaving approximately 2 inches undriven until you are sure of the edging’s placement.
To fill the gap between the edging and the side of the trench, you can add and compact the loose soil from when you dug the trench — this will also improve structural stability. You can use your feet or a tool like a spade to hold the edging in place while you do this.
It is then recommended to add a small amount of soil above grade almost up to the top edge of the metal and compact it into place.
Next, water the soil on each side of the edging so that it settles. If needed, add more soil and water until the surface is even and compact.
Step 4: Meeting the Edges
Meeting the edges can be difficult. Thankfully, most products come with connectors that enable you to join two sections together. Make sure that the sections overlap to prevent gaps where weeds can intrude or the sections can separate.
The exact type of connectors will vary depending on the brand and product of edging you choose. For example, Permaloc products have stakeless connection systems that allow you to simply snap two sections of edging together.
Troubleshooting Common Issues
Inadequate preparation is a common cause of issues with installing edging. Take time to measure and prepare the trench and to measure and cut the strips. Rushing through these steps is likely to cause ill-fitting or badly installed edging.
Many issues with edging are also a result of poor-quality products being purchased. While you can likely find edging at your local hardware or gardening store, it probably won’t last long and will be susceptible to shifting after frosts. For professional-quality edging, opt for dedicated providers like Permaloc.
Permaloc: Top-Quality Landscape Edging Products

Permaloc has provided landscaping professionals with the best quality edging and restraint systems for four decades.
Our popular products include CleanLine aluminum edging for commercial projects, ProLine edging for residential projects and accessories like spikes, adapters and connectors. For more information and our full range of offerings, check out our product page.
If you’re unsure how to install landscape edging best for your outdoor project, view our helpful installation instructions and videos for each of our product lines.


